Showing posts with label Orks. Show all posts

Friday, September 5, 2014

Grey Knights, Rumors, Warhammer Fantasy, and New Armies in the Cabal

Recently I've spent a lot of time preparing models for my traditional pre-winter priming, meaning that this blog and my general interest blog have been thoroughly neglected. Fortunately, there's nothing like a post of miscellanea for keeping the blog current:

Grey Knights
GW's release of the Grey Knights codex certainly took the community by surprise. After months of whispering about Dark Eldar, Space Wolves, etc., the rumormongers somehow completely missed that Codex: Grey Knights was to be the next release.

It was also a bit surprising that the Grey Knights received no new models or units. I supposed it made some sense; Grey Knights already had a lot of beautiful plastic models from 5th Edition whereas many of the new models that other armies got with their 6th or 7th Edition codexes were actually just plastic replacements for Finecast or pewter models rather than new units. Still, I half expected Grey Knights to get a pre-existing kit like the Stalker.

I still haven't played against Carl's Grey Knights under the new codex, so I don't know how much of a challenge they'll be. From what I've seen of the rules, though, I'd hate to play Daemons against them.

Rumors
And speaking of unexpected releases, it seems like the accuracy of rumors has become extremely poor in recent months. With Space Marines, we knew the entirety of the Space Marine codex a month in advance. The rumors nailed several details of the Tau and Eldar codexes early on. And the general idea of Imperial Knights was circulating almost a year before their release. Several rumors even predicted that we'd see a 7th Edition well before it was expected, and they even got some of the details right. However, certain rumors about 7th were aggressively wrong. Remember when a "reliable source" insisted that 7th Edition was moving towards a percentage-based force organization with "sideboards" catering to the tournament crowd? Fortunately, it didn't take long for White Dwarf leaks to show us that the truth was the exact opposite and we were going to get a ruleset that gave us extremely permissive "Battle-forged" armies and even more permissive "Unbound" armies.

I'd seen plenty of inaccurate rumors in the past, but it seems like they've been particularly bad recently. Rumormongers have been completely missing huge releases while giving us outrageously incorrect information and downright fantasies.

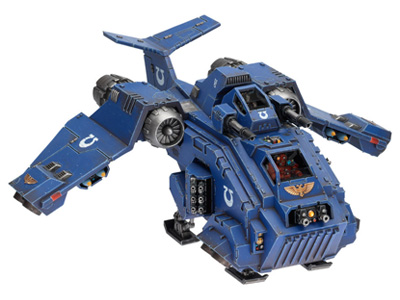
Where's my plastic Thunderhawk? Oh, right, GW
is still trying to get it to fit on six sprues.

How often did we hear that Guard would finally get those artillery kits that were previously available only from Forge World? It was only on the eve of the codex's release that we heard that, instead of new models, those artillery units had simply been removed from the codex. In their place, Guard ended up with the Wyvern. The Tyranid release was similar; units that were rumored to be getting models instead disappeared from the codex.

Were any of the long-standing Ork rumors true? (Grot-based armies? Choppas that had an AP value on the charge?) Did any rumors predict the Gorkanaut or the drastic changes to Mob Rule before the White Dwarf leaks? How often did we hear of a Dark Eldar/Blood Angels starter set before the Ork/Space Wolves collection and the Sanctus Reach Campaign took us by surprise?

Until the White Dwarf images leaked, how many rumors anticipated Logan Grimnar's chariot or the Stormwolf? Even while GW was rolling out new Space Wolves products, rumors incorrectly predicted that certain HQs would be getting plastic models.

And then Codex: Grey Knights, enormous Warhammer Fantasy kits, and the Nagash book simply dropped out of the sky while those with "inside information" were yammering about Dark Eldar, Necrons, Blood Angels, and Brettonians.

I've reached the point where, unless a rumor is  accompanied by photos, I simply don't believe it.

And Speaking of Fantasy...
The models of Nagash and his Mortarchs are absolutely amazing. I love my Space Marines' model line, but the Fantasy players seem to get some of the best toys. If I weren't already overwhelmed with piles of unfinished Ultramarines, these new releases (and earlier releases like the Vampire Lord on Zombie Dragon or the Coven Throne) would almost certainly convince me to start an Undead army.

They almost tempt me to play Fantasy

Several of the Cabal members are seriously considering starting Fantasy armies. Interestingly, as was the case with 40K, none of us are interested in the same armies. Bryce would do a Goblin-dominated Orcs & Goblins army, Jon would do Dwarves, Jake would field Lizardmen, and (if I were a faster modeler) I would want a Vampire Counts army led by Nagash.

Army Changes In the 40K Cabal
In the right column of this blog is a brief introduction to the members of our gaming group and the armies they play. After staying nearly constant for a while, I've had to update it recently (and learned this week that I'm going to have to revise it again) due to shuffling in some of our members' armies.

A few months ago, Bryce sold his Tau army to Jake, who is now trying to sell his Dark Angels to fund the Greater Good. Jake had really wanted to field a Ravenwing bike army but found that the Dark Angels' 2nd Company isn't particularly competitive on its own. When he played one or two games with Bryce's Tau and finally got to look through their codex (where he realized that he loved the fluff), Jake knew that the army was for him. It's always sad to see a friend fall into heresy.

In the meantime, always eager to try a new army, Bryce has since started a Raven Guard Space Marine army led by Shadow Captain Shrike. Although he hasn't actively played Space Marines in years, Bryce has loved the Raven Guard's fluff for quite some time. After playing Tau and Imperial Guard for so long, it's entertaining to watch him try to get used to an assault-oriented army again.

I've considered starting a second army for at least a couple years, but I've finally conceded that I'm rather fond of my Ultramarines and that I should actually put a dent in my pile of unfinished models before I start a new army. However, I do have a couple of unbuilt Imperial Knight models, which are eager to join the Ultramarines as an Imperial Knight Detachment.

Finally, to the great surprise of the rest of the Cabal, our Ork player bought the last Stormclaw box from Jake's HobbyTown this week. No, it wasn't for the Ork models (except for Face-rippa, he wasn't really impressed with the selection of greenskin units); it was for the Space Wolves. He even picked up the Space Wolves codex while he was there. That's right, one of our most diehard Xenos players will be bringing another loyalist Space Marine army to our tables, conveniently replacing the soon-to-be departed Dark Angels.

Although Jon claims it could be a year before he actually plays them, he's so excited about his new models that I predict that we'll be seeing Space Wolves a lot earlier than that.

Friday, January 10, 2014

The 2013 40K Cabal Tournament

[The following post was graciously provided by Sam, the Cabal's Necron player. Your humble blog administrator has made a few additions and edits where appropriate]

Cabal Escalation 2013 was hosted by Bryce on December 7th. The tournament was staged as “combat patrol” style battles with gradually increasing point limits. The final victory was awarded according to accumulated victory points.

The combat patrol style restrictions were based on the Adepticon rules, with a few variations. The rules were as follows:
  • Force organization at all point limits thusly:
    • 0-1 HQ
    • 1-3 Troops
    • 0-1 Elites
    • 0-1 Fast Attack
    • 0-1 Heavy Support
    • 0-1 Wild Card (used to supplement some other category)
  • No unique characters
  • No model with more than 2 wounds
  • No unit sizes greater than 20
  • Vehicle restrictions thusly:
    • Dedicated transports may have armor values up to 12.
    • All other vehicles may have armor values up to 11.
    • To accommodate Necrons the vehicles were treated as having no Quantum shielding (effective armor 11) and given a point reduction.
I will present the armies, scenarios, and highlights of each game by round. Unfortunately, as I was playing Necrons, I don’t have the full details from the other games.

Scenario 1 – Eternal Darkness (400 Points)
While deploying to an uncharted area, you have missed your drop zone by many miles. All sensors are unfamiliar with the territory and the area is bathed in darkness. Your scouts have informed you that they have spotted an enemy force of unknown size in the area. It is your job to capture an enemy unit for “questioning” to further your knowledge of the enemy forces.

Victory Conditions: First Blood, Line Breaker, Kidnap Enemy Unit (2 Victory Points)

Kidnap Enemy Unit – To kidnap an enemy unit, the kidnapped unit must have been beaten in close combat by 2 or more unsaved wounds AND have at least one model left in the unit. If these conditions are met the unit is considered captured and the player who captured the unit cannot capture any further units for the rest of the game.

Imperial Guard:
1 Platoon:
  • 5 Man Platoon Command Squad; Commander w/ Laspistol & Close Combat Weapon
    • Chimera transport w/ Heavy Bolter and Multi-Laser
  • 7 Man Infantry Squad; Sergeant w/ Laspistol & Close Combat Weapon
  • 9 Man Infantry Squad w/ 1 Grenade Launcher; Sergeant w/ Laspistol & Close Combat Weapon
  • 1 Heavy Weapons Team w/ Heavy Bolter
  • 6 Man Special Weapons Squad w/ 3 Demolition Charges
1 Scout Sentinel Squadron w/ 3 Scout Sentinels, each w/ a Multi-Laser

Ultramarines
6 Man Tactical Squad w/ 1 Flamer
6 Man Tactical Squad w/ 1 Flamer; Sergeant w/ Plasma Pistol & Chainsword
  • Razorback transport w/ TL lascannon
5 Man Devastator squad w/ 4 Missile Launchers, Sergeant w/ Bolt Pistol & Chainsword

The Guard render the Razorback weaponless very quickly and secure First Blood by blowing up the embarked Tactical Squad with Demo Charges. However, that Razorback survived and started tank shocking the Guardsmen left and right. The Scout Sentinels and Devastators traded fire for most of the game, ending with the Devastators dead and the Scout Sentinels in Linebreaker position. The second Tactical Squad gets charged by two units of Guardsmen and loses the Sergeant when his Plasma Pistol overheats during overwatch [this seems to happen more often than not]. The Ultramarines pull through in the end, winning the combat and capturing the remaining Guardsmen. The game ends with carnage strewn across the battlefield and 2 victory points apiece.

Necrons
5 Warriors
8 Immortals w/ Tesla Carbines
2 Heavy Destroyers
1 Annihilation Barge w/ Tesla Cannon

Grey Knights
5 Man Strike Squad w/ 1 Psycannon and 1 Daemon Hammer
  • Razorback transport w/ TL lascannon
5 Man Strike Squad w/ 1 Psycannon and 1 Daemon Hammer
  • Razorback transport w/ TL lascannon

Necrons cower for the first round and the Grey Knights can’t do much with the high value targets in cover. The Destroyers come out and try to burn a Razorback for First Blood, but are ineffective, while the Barge does minor damage. In turn two the Lascannon fire burns through the Annihilation Barge, awarding First Blood, while Storm Bolters and Psycannons start to pick away at the Necron infantry.

The Destroyers manage to blow one Razorback before succumbing to fire along with the Warriors. The Immortals recognize that only Linebreaker will award a tie and begin a mad rush for the enemy. They take heavy fire, but some lucky resurrections get them a few inches closer. They barely make it into combat with one of the Strike Squads just outside the Grey Knights deployment zone. The remaining Razorback takes up a blocking position, hoping to keep the Necrons out.

In the final turn the Necrons kill the last two Marines who barely fail their armor saves. The Immortals need 6 inches from consolidation to get one robot into the deployment zone around the Razorback, and they get it! The game ends with 1 victory point apiece.

Orks
20 Boyz w/ 19 Shootas and 1 Big Shoota
10 Lootas

Tau
9 Man Fire Warrior Team
3 Man Stealth Team, each w/ a Burst Cannon
3 Man XV8 Crisis Team, each w/ a Burst Cannon & Missile Pod
1 Piranha w/ Fusion Blaster

*No data returned; all combatants presumed KIA.*
[As I understand it, the Green Tide rolled over the opposition, as usual.]

Scenario 2 – Interrupt reinforcements (500 Points)
While scouting the territory, you encounter an enemy insurgent. Knowing that they are aware of your forces you know you must stop all communications with their command to prevent any enemy reinforcements to the area.

Victory Conditions: First Blood, Line Breaker, Destroy Communications Tower (2 Victory Points)

Communication Tower - T7 , W2, Sv3+, Stealth

Imperial Guard
1 Platoon:
  • 5 Man Platoon Command Squad; Commander w/ Laspistol & Close Combat Weapon
    • Chimera transport w/ Heavy Bolter and Multi-Laser
  • 7 Man Infantry Squad w/ 1 Grenade Launcher; Sergeant w/ Laspistol & Close Combat Weapon
  • 9 Man Infantry Squad w/ 1 Grenade Launcher; Sergeant w/ Laspistol & Close Combat Weapon
  • 1 Heavy Weapons Team w/ Heavy Bolter
  • 6 Man Special Weapons Squad w/ 3 Demolition Charges
1 Scout Sentinel Squadron w/ 3 Scout Sentinels, each w/ a Multi-Laser

5 Man Storm Trooper Squad w/ 1 Meltagun

Necrons
5 Warriors
9 Immortals w/ Tesla Carbines
2 Heavy Destroyers
2 Canoptek Wraiths w/ 2 Particle Casters
1 Annihilation Barge w/ Tesla Cannon

The first turn progresses as a comedy of errors. Necrons steal the initiative and move aggressively towards the Guard. This backfires as 1 of the Destroyers bashes his main processor out on some difficult terrain and the other fails to hit anything. The Annihilation Barge and Immortals unleash the Tesla guns on a squad, hoping for First Blood, but only kill a few Guardsmen. Least effective steal the initiative ever.

The Guard respond by blowing away the remaining Destroyer, claiming First Blood. The Heavy Weapons Squad then tries to end the Wraiths with three Demo Charges. Two hit, and kill a Wraith, but one hapless Guardsman scatters his Demo Charge directly back, killing half his squad and stunning the Chimera.

In turn two the last Wraith makes a leap for the Comm Tower and assaults while the Barge brings the love, numerous hits resulting in one glancing hit and 5 penetrating hits on the Scout Sentinel squadron. Kaboom! The Immortals blast away at the hapless Guardsmen. The Guard forces are diminishing quickly, but respond with their ace in the hole: the Commandos accurately Deep Strike right onto the Necron Comm Tower, but fail to damage it. The Chimera rushes by the Guard Comm Tower and steals it from the Wraith while the remaining Guardsmen manage to destroy the Barge after a tactical error in which the Necrons trade a Jink save for higher fire power.

In the next Necron turn the Warriors and Immortals backtrack to protect the Comm Tower and start to whittle away the Commandos while the Wraith again charges the Guard Comm Tower and destroys it. The Guard are looking thin, but make their bid for victory. The Commandos again try to take down the Necron Comm Tower, but fail. In the last turn the Wraith takes up position to destroy the Chimera within the deployment zone, the Immortals and Warriors cut down the Commandos, and Bryce calls the game. Final Tally: 1 point to Imperial Guard, 3 points to Necrons.

Tau
9 Man Fire Warrior Team
3 Man XV8 Crisis Team, each w/ a Burst Cannon & Missile Pod
3 Man XV8 Crisis Team, two Battlesuits w/ a Missile Pod & Plasma Rifle and one Battlesuit with two Plasma Rifles
1 Piranha w/ Fusion Blaster
4 Man Pathfinder Team w/ Markerlights & Pulse Carbines

Grey Knights
5 Man Strike Squad
5 Man Strike Squad
1 Vindicare Assassin
2 Razorbacks w/ twin-linked Lascannons

The Vindicare Assassin is put to good use killing Battlesuits and the Tau retaliates by destroying one Razorback. The remaining Razorback and the Strike Squads bring down the Comm Tower and completely destroy the Fire Warriors. The game ends with 3 points to the Grey Knights and 1 to the Tau.

Ultramarines
6 Man Tactical Squad w/ 1 Flamer; Sergeant w/ Bolt Pistol & Chainsword
  • Razorback transport w/ TL lascannon
5 Assault Terminators w/ 1 Stormshield & Thunder Hammer and 4 pairs of Lightning Claws
5 Man Devastator Squad w/ 4 Missile Launchers; Sergeant w/ Bolt Pistol & Chainsword

Orks
20 Boyz w/ 18 Shootas and 2 Big Shootas
10 Lootas
3 Big Gunz w/ Kannons, 10 Gretchin, 1 Runtherd, & 3 Ammo Runts

[Sealed by the Inquisition; it's best that the degree to which the Ultramarines were stomped not be revealed. Suffice it to say, the Ultramarines had no confidence that their 500 point list could take on a horde and were proven correct.]

Scenario 3 - Exterminatus (600 Points)
You have just intercepted a message from the Imperial Battleship Triton stating that the planet that you are on has been slated for Exterminatus. A Nova Cannon blasts the planet's surface each turn at a specified beacon location (center of the board). A single unit can capture the beacon and if held for an additional turn (until the end of the controlling player's turn) that unit is immediately teleported off planet.

Victory Conditions: First Blood, Slay the Warlord (highest leadership unit), Teleported Unit (3 Victory Points)

Nova Cannon S10, AP2, Small Blast*, Barrage
*Small Blast scatters 2d6 inches from beacon location at the beginning of each players turn. Hits from the Nova Cannon are resolved prior to the movement phase in the given turn.

Ultramarines
10 Man Tactical Squad w/ 1 Flamer; Sergeant w/ Melta Bombs, Bolt Pistol & Chainsword
  • Drop Pod transport
5 Assault Terminators w/ 2 Stormshields & Thunder Hammers and 3 pairs of Lightning Claws
5 Man Devastator Squad w/ 4 Missile Launchers; Sergeant w/ Bolt Pistol & Chainsword
  • Razorback transport w/ TL lascannon

Tau
9 Man Fire Warrior Team
2 Man XV8 Crisis Team, each w/ a Burst Cannon & Missile Pod
3 Man XV8 Crisis Team, two Battlesuits w/ a Missile Pod & Plasma Rifle and one Battlesuit with two Plasma Rifles
1 Piranha w/ Fusion Blaster
3 Man XV88 Broadside Team, each with TL Heavy Rail Rifle & TL Smart Missile System

The Tactical Squad lands in the first turn, mostly survives a round of shooting from the XV88s, and assaults the Broadsides by the second, tying them up for the rest of the game. The Razorback explodes the Piranha, earning the Marines a Victory Point for First Blood. The Terminators sit on the objective and absorb multiple missiles, Burst Cannon rounds, and plasma shots from two squads of Crisis Battlesuits. For the most part the Storm Shields keep the squad in the game despite the amount of AP2 coming their way. However, the Sergeant is eventually lost, giving the Tau Slay the Warlord. The Devastators keep the heat off the Terminators by picking the Battlesuits off one by one. Two Lightning Claw Terminators are left standing when they are finally teleported, gaining the Astartes 3 Victory Points for a 4 to 1 victory.

Imperial Guard
1 Platoon:
  • 5 Man Platoon Command Squad; Commander w/ Laspistol & Close Combat Weapon
    • Chimera transport w/ Heavy Bolter and Multi-Laser
  • 7 Man Infantry Squad w/ 1 Grenade Launcher; Sergeant w/ Laspistol and Close Combat Weapon
  • 9 Man Infantry Squad w/ 1 Grenade Launcher; Sergeant w/ Laspistol & Close Combat Weapon
  • 1 Heavy Weapons Team w/ Heavy Bolter
  • 6 Man Special Weapons Squad w/ 3 Demolition Charges
  • 6 Man Special Weapons Squad w/ 3 Demolition Charges
1 Scout Sentinel Squadron w/ 3 Scout Sentinels, each w/ a Multi-Laser

5 Man Storm Trooper Squad w/ 1 Meltagun

Grey Knights
5 Man Strike Squad w/ Nemesis Falchions, 1 Psycannons & 1 Daemon Hammer
2 Razorbacks w/ twin-linked Lascannons

*No data returned; all combatants presumed KIA.*

Orks
20 Boyz w/ Shootas
20 Boyz w/ Shootas
20 Boyz w/ Shootas
10 Lootas 3 Big Gunz w/ Kannons, 10 Gretchin, 1 Runtherd, & 3 Ammo Runts

Necrons
8 Warriors
10 Immortals w/ Tesla Carbines
1 Triarch Stalker w/ twin-linked Heavy Gauss Cannon
2 Heavy Destroyers
1 Annihilation Barge w/ Tesla Cannon

The Necrons knew that they couldn’t hold the Boyz off the objective. The Tesla and Gauss slingers simply formed a line to try blasting Boyz as they approached the marker. But with half the army geared for killing tanks and some poor rolling, they just couldn’t make a statement. The Boyz marched forward with only slight losses, while the return fire from so many Shootas and incoming support from Lootas and Kannons cleaned the Necrons out by turn 3. With every Ork unit still on the board to claim the Transport Beacon the game ended with 5 victory points to the green hoard and the undead skulking back to their tomb world with nothing to show for their effort.

[I can't remember the exact scores, but Best General went to Jon and his Orks.]

Sunday, February 24, 2013

Death from the Skies and Thoughts on Marine Flyers

I ordered the Death from the Skies compendium on February 15th during the few hours in which it was still listed as "available for Advance Order" (2/15/13). It arrived yesterday along with the Imperial Guard codex I bought to avoid having to pay for shipping.

The Book
To be honest, I haven't done much more than to flip through Death from the Skies. Rather than work my way through it as I usually would, I immediately opened it to the Stormraven and Stormtalon entries (I'm expecting a Stormraven and two Stormtalons to arrive from TheWarStore any day now). Once I committed those portions to memory, I took a few minutes to actually look at the rest of what my $33 bought me.

The book is beautiful, having been published in the colorful and detailed style that we've come to expect with 6th Edition 40K. After a few pages of artwork (including an awesome painting of a Heldrake crouched on a Valkyrie and burning a hole through its cockpit) you come to a short introduction. Following the introduction are about 15 pages describing the Battle for Cardrim, which is reprinted from the June 2012 White Dwarf ("Aerial Assault!"). Nearly 20 pages of air war missions and optional dogfighting rules follow. Some of these look interesting, but I don't really see our cabal playing too many of them. As usual, there are several pages of professionally painted models, several of which originally appeared in White Dwarf. The final 17 pages contain the updated rules for all flyers released prior to 6th Edition as well as a convenient reference page.

While the preceding content is interesting, I think most players are interested in the rules section. The book contains significant changes to the Stormtalon and introduces the Codex Space Marine version of the Stormraven; material that goes beyond the scope of the average FAQ. However, there appear to be very few, if any, significant changes to other flyers that haven't already been addressed elsewhere. A comparison between the Imperial Guard codex entries for the Valkyrie and the Vendetta and the entries in Death from the Skies shows that the only difference is the unit type and the deletion of the Deep Strike and Scout special rules (these changes have been addressed in the FAQs). While the FAQ for the Ork codex says that updated rules for their flyers are located in the new book, I couldn't find any substantial differences between the June 2012 White Dwarf and the compendium with the exception of unit type, which was already addressed in the 6th Edition rulebook. Points values and special rules seem to be the same except for the deletion of the obsolete Aerial Assault rule (more on that later). The terms "flyer" or "flying monstrous creature" have been added to the wording of rules that only mentioned skimmers before. And the Fighta Ace upgrade that gives the Dakkajet BS3 against flyers, jetbikes, skimmers, or zooming flying monstrous creatures has inexplicably been renamed as Flyboss. Unfortunately, I can't tell if there have been any other changes since I don't have the relevant codexes.

In short, the only ones who actually need the content of this book are Codex Space Marine players and Ork players who missed out on "Aerial Assault!". As an Ultramarines player who has wanted to field a Stormtalon since it was released and who has coveted the Stormraven since the earliest rumors indicated that flyer rules would be incorporated into 6th Edition, I fell into the category of those who needed Death from the Skies. I know that having to buy a $33 book just to get a few pages of updated flyer rules has become a sore point with hobbyists who have to be more frugal, but as a person with a bit more disposable income than some, I was happy to add such an attractive book to my collection. And from a more practical standpoint, this relatively low cost book allows me to see what any Necron/Ork/Dark Eldar/Marine player standing on the other side of the table might be bringing to the game. The various armies' flyers have a huge variety of unique weapons and abilities that can come as a nasty surprise to the unaware (I was certainly unsettled when Kevin demonstrated the Voidraven's S9 AP2 void lances and mines).

As I said before, the bulk of the changes affect Codex Space Marines. I'd read enough rumors about the revised rules that I wasn't really surprised by what I found, but it was still nice to see it for myself on the printed page. Here are some of the changes that will interest my fellow Astartes players:

The Stormraven
Well before I had the book in my hands, it had been officially confirmed that Codex Space Marines can now field the Stormraven. The in-universe reason given for why my Ultramarines can now take a Stormraven is very similar to the justification given for allowing other Chapters access to the Black Templar's Land Raider Crusader pattern:
The Stormraven Gunship is a relatively recent introduction to the armouries of the Adeptus Astartes. Indeed, as befits a bureaucracy as labyrinthine and cliquish as that of the Imperium, there are no official records to explain the vehicle's emergence. Certainly, the Stormraven began service and proved its worth within the Grey Knights and Blood Angels Chapters, and some records suggest that it was not meant to see broader use until the Adeptus Mechanicus were fully satisfied with its performance. However, in such dire times as these, when the fate of Humanity itself rests on a knife's edge, the Adeptus Astartes need every weapon they can find, sanctioned or not, and many Space Marine Chapters now field a handful of the aircraft alongside their more traditional strike vehicles.
The Codex Space Marine Stormraven is nearly identical to the Blood Angels' version. The only difference is the four S8 AP2 stormstrike missiles it carries instead of the Blood Angels' S8 AP1 bloodstrike missiles. The Army List section of the book presents the Codex Marine Stormraven as being the base model while two smaller boxes indicate how those fielded by the Grey Knights and the Blood Angels differ (e.g., "Stormravens in detachments chosen from Codex: Blood Angels must replace their stormstrike missiles with bloodstrike missiles"). Unfortunately, the box for the Grey Knights' Stormraven neglects to state that their flyer is a Fast Attack choice; an oversight that briefly led to the model being listed in the army's Heavy Support section on GW's own website. This has since been revised through the Death from the Skies errata, which clarifies that the Stormraven is still a Fast Attack choice for Grey Knights. With this correction in place, there are no changes to the Grey Knights' or Blood Angels' Stormravens that aren't in the online FAQs.


The fact that a correction was issued almost immediately upon the book's release is certainly a mark against it, but it's better than the multiple errata that several of my $100+ engineering text books required.

It should be noted that the Stormraven has been nerfed somewhat with the release of Death from the Skies and the FAQs. The Shadow Skies/Skies of Blood rules enjoyed by the Grey Knights and the Blood Angels, respectively, have been changed to the generic Skies of Fury rule that also applies to Codex Marines. The new rule requires any units that jump out of a zooming Stormraven to behave as if they are deep striking, but with the additional requirement that any scatter will result in having to take a Dangerous Terrain test. (Thank goodness 6th Edition allows armor saves to be taken for failed tests.) I believe this means that GK Interceptors have lost the ability to land without drifting and Blood Angels jump troops can no longer avoid taking a Dangerous Terrain test or scatter only 1D6 per the Decent of Angels rule.

It looks like GW is explicitly discouraging the use of Skies of Fury as a combat tactic in favor of more orthodox deep striking methods. The only advantage of Skies of Fury is that it allows two units (the Stormraven and an embarked squad) to enter play at the same time. Other than that, your expensive Vanguard or Terminator Squad might as well be performing a standard deep strike. Most other units that don't have the ability to deep strike unaided can take a cheap drop pod that is a lot more likely to land your troops in the right place and intact. (Does GW really think that any Marine player in his right mind would load a Tactical Squad into a Stormraven instead of a drop pod?)

Now, I'm not saying that the Skies of Fury rule is worthless, just that it would be better named "Skies of Risk Management". Ideally, a Codex Marine or Blood Angel Stormraven assault would go something like this: the flyer zooms out of reserves and onto the table, shoots up a target unit, survives a round of shooting, goes into hover mode, allows a squad of jump infantry to disembark, shoots up the target unit some more, and then the disembarked squad uses its jump packs to assault the target unit while benefiting from the Hammer of Wrath rule. However, conditions in Warhammer 40,000, like real war, are rarely ideal. A Stormraven and its expensive cargo may very well arrive on a table covered with Vendetta Gunships, quad guns, Icarus lascannons, waves of Lootas, etc., where there's a high probability that the flyer will be shot down before it can go into hover mode and discharge its passengers. In those circumstances, Skies of Fury simply provides a way for troops to leave the vehicle more or less safely while the pilot contemplates going down in a blaze of glory. In other words, you probably shouldn't deliberately plan to disembark a squad from a zooming flyer, but instead think of it as a last ditch effort to save it.

Stormtalon
I bought the "Aerial Assault!" issue shortly after it came out, although I didn't even buy a Stormtalon until recently. Death from the Skies has changed the flyer's rules quite a bit, making the flyer even better but rendering the White Dwarf issue worthless to me except for the painting tutorial. For starters, the Stormtalon now has the unit type of Flyer, Hover rather than just Flyer as listed in the back of the 6th Edition rulebook. (That a vehicle characterized by vectoring engines and downward-pointing nozzles could lack the Hover type is laughable.) It has retained its melta-resistant ceramite plating and its wargear options. However, the points cost of the base flyer has been lowered by 20 points while the cost of the weapons upgrades have changed: the cost of the skyhammer missile launcher has been reduced by 10 points and the cost of the twin-linked lascannon and typhoon missile launcher have each been increased by 10 points. Despite the increased cost of two of the weapons options, the net result is that a Stormtalon with any loadout will now be slightly cheaper than it was under the White Dwarf rules.


All of the Stormtalon's special rules have changed; several of them drastically. The Aerial Assault rule allowing the flyer to fire all of its weapons after moving at cruising speed is completely gone since it was superseded by general flyer rules. The Stormtalon still has the Escort Craft rule, which is nearly the same as before, although the prohibition on escorting deep striking units has now been extended to outflanking units as well. The Hover Strike rule has been deleted entirely and has been effectively replaced (more on this later). Finally, the Stormtalon no longer has the Supersonic rule. This makes a lot of sense; the Stormtalon is clearly meant to be a close support aircraft, not a supersonic fighter, and wouldn't typically need the extra movement distance granted by the Supersonic rule.

The biggest change to the Stormtalon's special rules was the de facto replacement of Hover Strike with Strafing Run. Hover Strike was a unique rule that gave the Stormtalon BS5 while firing at non-skimmer targets in exchange for becoming a Skimmer type vehicle that must remain stationary during the preceding movement phase. This rule was horribly situational since the only time it would be beneficial to turn an otherwise hard to hit flyer into an immobile skimmer with a slightly improved ballistic skill was when a high value target absolutely had to die. Strafing Run also started out as a unique rule that was first given to the Dakkajet in June 2012's White Dwarf. Shortly thereafter, the rule found its way into the 6th Edition rulebook.

Like Hover Strike, Strafing Run gives a Stormtalon BS5 when shooting at any unit that is not a skimmer or a flyer. However, Strafing Run doesn't require that the flyer remain immobile or even to go into hover mode. In other words, a zooming Stormtalon can fire a twin-linked assault cannon and its other weapon (two of the options also being  twin-linked) at BS5 as long as it's not shooting at a skimmer or a flyer. I know a lot of people laugh at giving a boost to a BS4 vehicle that can carry so many twin-linked weapons, but I've missed too many shots with a Razorback's twin-linked lascannon to scoff at the slight edge that the improved ballistic skill gives you.

As a side note, our Ork player, Jon, is seriously displeased that my Stormtalon (without upgrades) now costs as much as his Dakkajet while having better armor and an absurd ballistic skill thanks to Strafing Run. The fact that mine has only two hull points and his has three gives him little comfort.

Sunday, January 27, 2013

Models In Progress and Recent Battles

It was recently brought to my attention that I've failed to update the 40K blog for over a month. Appropriately enough, the neglect was due to my push to increase the size of my current army and significantly increase its competitiveness.

Modelling
My first five Tactical Marines
When I started the hobby, I turned out five Tactical Marines from the beginner's paint set, a full ten man Tactical Squad, five Terminators, one captain, and a multi-melta Dreadnought (i.e., the Black Reach kit) within four months. The next month I had added a Vindicator, Vastator, to the army. I've since completed several other models, but not at the rate that I had achieved early on.

Right now I can muster between 1300 and 1400 points of fully painted models. The army's come a long way since I finished the Black Reach force, but it's lacking in a few areas. Hoping to grow my army as quickly as I had a year and a half ago, I started a project I call "Black Reach II". The intent of this was to recreate my efforts of mid-2011 by adding another Tactical Squad, a Terminator Squad (a close combat one, this time), an HQ, and a Dreadnought (an Ironclad) to my army.

A few weeks ago I began to prepare enough Marines to be able to field a second Tactical Squad with all the special weapons and most of the heavy weapons options. (As much as I love Telion and his Scout Squad, their usefulness as a troop choice is very situational and I often find myself wishing that I had ten more suits of power armor on the table.) I've also begun to prepare seven close combat Terminators: three with storm shields and thunder hammers and four with paired lightning claws. These seven will eventually be joining a Terminator Chaplain (which I haven't even taken out of the package yet) in a Land Raider Crusader (also still in its box). I expect this Terminator force to give me the close combat unit that I've been sorely lacking. Finally, I've pulled my Ironclad Dreadnought kit out of storage. I've had a bit of luck landing an assault cannon Dreadnought via a drop pod behind or near the rear lines of Jon's Orks and look forward to doing so with AV13, an additional attack, and twin heavy flamers.

I wish I could finish models as quickly as before
Unfortunately, my grand schemes have been delayed by this year's unusually cold winter, which isn't ideal for undercoating any of my models. Once things warm up, though, I'll have quite a few models ready for painting.

Recent Battles
Space Marines/Tau vs. Orks
A couple weeks ago saw 1250 points of my Ultramarines allying with 1000 points of Bryce's Tau against 2250 points of Jon's Orks. The fighting was brutal as the shear number and variety of Ork units nearly overwhelmed our joint armies. The dice gods were fickle as my Tactical Squad's sergeant was again killed by his own plasma pistol while the rest of his squad couldn't hit the broad side of a barn. The Captain tried to shield his men with his artificer armor, but an unfortunate series of ones quickly took him out. The only bright light of the squad was a lone special weapon Marine who swept his flamer over the onrushing mob and removed an above average number of greenskins. On the other end of the spectrum of luck, Telion and his men made a bizarre number of 3+ cover saves while drawing the Orks' fire turn after turn.

The drop pod with my assault cannon Dreadnought fell exactly where I wanted it and the walker started to chew up Jon's Lootas in his rear lines. Unfortunately, the fire from two Loota squads and a missile from a wayward DeffKopta immobilized and stunned the Dreadnought, preventing it from charging the Orks. Since the Dreadnought now sat with its guns pointing away from any useful targets, Jon thought it was safe to leave it alone...

Although Bryce's Fire Warriors were lost early on, the Broadsides, the Tau commander, and the commander's body guard wreaked havoc. A lucky snap shot brought down the Ork's Dakkajet while Jon's new Battlewagon was destroyed by a Broadside's guns. The Warboss and his Burna Boyz were unceremoniously dumped into a crater where they failed their pinning test. The Tau whittled down the Burna Boyz and left an angry Warboss in the rear of the mob with one remaining wound. The Emperor must have been smiling on my Dreadnought; the stunned walker successfully snap fired at the Warboss, scored a wound, and the Warboss failed his Look Out Sir roll and a cover save. Although crippled shortly after entering the game, the Dreadnought nearly won back most of its points with that single lucky shot.

(In case anyone is wondering, the Imperium denies that the Tau killed more points than the Space Marines did that night. Any reports to the contrary are clearly Xenos propaganda.)

Space Marines vs. Dark Eldar
The same 1250 point army I took against the Orks was used against the Dark Eldar this weekend. The Ultramarines had the first turn but accomplished almost nothing when the dice wouldn't cooperate. Fortunately for me, the Dark Eldar had the same problem and very little damage was done to either side.

With a brief prayer to the Emperor, my Munitorum dice began to cooperate and my army started to do some serious damage. Dark Eldar Venoms and Raiders exploded or were reduced to wrecks thanks to lucky assault cannon shots, my Razorback's lascannon, the heavy bolters and autocannon of Spear of Talassar, Vastator's demolisher cannon (the shot was a gamble since the Terminators were only a few inches away from the expected blast), and the Tactical Squad's missile launcher. Marine losses were relatively light, although the Dreadnought was quickly dispatched by haywire grenades and Telion and his squad were wiped out when a Venom got behind their position and peppered them with poison shots.

With all the skimmers down, the Marines faced off against the transports' contents. Kevin's Wyches assaulted the Terminators while the Tactical Squad turned its guns on the Kabalite Warriors. The Terminators took seven wounds but saved all of them; the Wyches weren't so lucky and the survivors were sent running. Storm bolters and an assault cannon ensured that they wouldn't be coming back. The Marines' bolters dispatched all but three Kabalite Warriors. However, the Ultramarines were denied a clean victory; with the three survivors keeping the Dark Eldar in the game, Kevin was finally able to make his reserve rolls and bring two Voidraven Bombers (Razorwing models filled in for the soon to be released flyer) onto the table.

Spear of Talassar isn't too effective against power
armor, but it usually makes short work of Xenos.
The Voidravens, which are AV11 and can't be brought down by bolters, spent the bulk of their time trying to destroy those units that could actually do damage to them. The Razorback was first to go while the Predator survived multiple shots with some damage. By the end of the fourth turn it was obvious that the Marines weren't going to bring the flyers down before the end of the game while the bombers would be unable to significantly reduce the number of surviving Marines. We finally called the game in favor of the Space Marines, recognizing that they would certainly have the most units and points left by the end of the theoretical sixth turn. The game was fun and I came out with the victory (which is rare), but it wasn't particularly satisfying.

Now that three members of our Cabal play with flyers (Kevin has two Razorwing models, Jon occasionally fields a Dakkajet, and Carl's Grey Knights have a Stormraven), I just might have to buy those Stormtalons I've been wanting.

Thursday, October 4, 2012

Astartes vs. Orks Lessons Learned

The weekend before last, Carl, Jon and I got together for some Astartes-vs-greenskins action. Carl and I each brought 1000 points of Grey Knights and Ultramarines, respectively, while Jon fielded 2000 points of Orks. The game was pretty long and I was too tired to remember it well enough to recount it with my usual level of detail, so I'll simply put down what we got out of it.

The game was pretty much a wholesale slaughter and we called it at around 12:30 AM. A quick count showed that, cumulatively, Carl and I had about 500 points on the table compared to Jon's 600 points. Although Jon had more points left, it was hard to declare anybody the winner or even to guess what would have happened if we had time for one or two more turns. Most of Jon's remaining points were in two Loota Squads and his Blitza-Bommer. At the time we called the game, Carl's remaining Grey Knight troops and my undamaged multi-melta Dreadnought were one turn away from engaging the Lootas. Meanwhile, my fully intact 5 man Scout Squad was taking potshots at them. On the other hand, the Marines were limited in what they could do to the Bommer thanks to the range of the weapons they had left. The only option for a Marine victory would have been to wipe out the units on the table and to wait until the Bommer ran out of room and had to leave.

"I Lost as Soon as I Made My List"
Well, the subheading is probably an exaggeration, but I wasn't too pleased with my list when I finally got to the table. For starters, I brought my lascannon Razorback. This is typically a decent choice and a good way to bring a twin-linked lascannon to the table. However, I only had 1000 points to play with and I knew that I would be facing Orks. You don't need a 40 point vehicle with a 35 point lascannon to take down Ork armor when much cheaper missile launchers will easily pop a Killa Kan. Heck, now that troops can land grenades on walkers based on their weapon skill, I could easily have brought down Jon's Killa Kans by assaulting them with Tactical Squads. The 75 points I spent on the Razorback would have been better spent elsewhere.

I also brought a five man Tactical Squad to increase the number of bolters on the table. Given that a standard bolter round needs a 4+ to wound even Boyz, I clearly should have skipped the Razorback and the small Tactical Squad and rolled the points into a stand-in Sternguard Squad (the Cabal is pretty forgiving of substitutions). Hellfire rounds would have made short work of Jon's mobs. Similarly, I skimped on my Captain by giving him a power sword rather than a relic blade. A Space Marine Captain's stats may be pretty good, but when his strength 4 means that he needs a 4+ to wound lowly Ork Boyz, he's going to be overwhelmed pretty quickly. I lost 13% of my total army when the Captain fell. He probably would have lived longer if I had spent 15 more points for a strength 6 attack.

Carl's list was a bit more effective. He skipped on the Terminators to be able to put more troops on the board. His Interceptor Squad was able to neutralize one of Jon's three Loota squads by teleporting immediately behind them and dismantling the mob within a couple turns. Carl's only regret was that he didn't have ten Interceptor troops so he could combat squad them and really give Jon a hard time.

Wrong Airplane
Jon has built his Ork flyer so he can play it as a Dakkajet or a Blitza-Bommer. He's often tempted to play it as a Blitza-Bommer so he can drop a bomb during the movement phase and then turn his guns on something during the shooting phase. Unfortunately, he has rarely been able to pull this off effectively. In fact, I can't remember his Bommer killing a single model that night. Jon regretted not bringing the Dakkajet for this game.

Astartes that Stay Together, Slay Together
Carl and I had won the roll-off for first turn, so I spread the two Combat Squads formed from my 10 man Tactical Squad and the troops in my five man Tactical Squad across my half of our deployment area with the intention of making any approaching mobs take heavy fire during the entirety of their march. Unfortunately, Jon successfully seized the initiative and was able to get two mobs of Boyz a respectable distance across the table before even taking a casualty. A nagging voice in my head said that I should consolidate my Marines and that I should concentrate my fire on the nearest mob while slowly retreating from the farther group. Ideally, this would neutralize the closest mob and keep my troops at full strength for the inevitable assault by the second mob.

Instead of paying attention to that voice, I divided my fire between the two mobs in the hopes that I would wear each one down enough to survive close combat. Some less than stellar dice rolls combined with the swiftness of the Ork's approach meant that each squad was quickly swamped. Jon took heavy losses, but my Marines were decimated.

Saturday, September 1, 2012

40K Cabal Battle Report: First Allies Game

Although we have multiple tables, it's not unusual for our 40K group to play in teams of two. Typically each player brings an identical number of points to the table and we pair off, rarely considering whether the pairs make any sense or not. However, this past week Jon, Bryce, Carl, and I decided to try out 6th Edition's allies rules. Each of us brought a 1000 point primary detachment list and a 750 point allied detachment list. To make things interesting, we decided to randomly determine which armies would play as the primary detachments and which would be their allies. The alliances themselves were also randomly decided through dice rolls. The same was the case for the mission type and the deployment map.

In the end, Jon's Orks formed one primary detachment with Bryce's Tau army serving as allies of convenience. (Bryce had been neglecting his Tau army until he concluded that 6th Edition belongs to the shooty armies and added several Battlesuits to his existing force.) Carl's Grey Knights were the other primary detachment while my Ultramarines were his allies of convenience. The mission turned out to be the The Scouring while the deployment map was the Hammer and Anvil. One primary objective marker worth two victory points ended up on the Astartes side of the board while another marker was immediately between both armies.

My 750 point force included a Captain, a vanilla 10 man Tactical squad, a five man Sniper Squad with a missile launcher, five Terminators with an assault cannon, and a Vindicator. Carl brought a Brotherhood Champion, a Land Raider, two Terminator Squads, a heavy bolter Razorback, and a Purgation Squad. By luck, the Purgation Squad started out on top of one of the two objectives.

Jon brought his usual mob whose size boggles the mind of an Astartes player. He had a Big Mek with a Shokk Attack Gun, a three man Warbiker Mob (with one Nob), a Killa Kan, two squads of Lootas, a DeffKopta, and two 20 man mobs of Boyz. Bryce's force consisted of a Commander in a Battlesuit with a fusion blaster, his three man Crisis Battlesuit Bodyguard, a 12 man Fire Warrior Squad, a three man Stealth Team, a Piranha Skimmer with a fusion blaster, and a three man Broadside Battlesuit Team. The maddening amount of firepower and Battlesuit-granted durability that a "small" Tau army can bring makes me wonder if the 6th Edition Tau Codex will have more than a few points adjustments.

Rather quickly Carl and I realized that we were in trouble. For starters, the arrangement of the alliances reminded me a lot of a game we played earlier this year, In which Bryce's Imperial Guard and Jon's Orks faced off against my Ultramarines and Carl's (at the time) borrowed Grey Knights. In both games, a long range shooty army joined with a close combat army to fight against smaller, more elite Space Marine armies. And once again the Marines had to go second. Then there was the deployment map; we were playing on a 4'X8' board, so the Hammer and Anvil arrangement left us with a table just 4' wide and 8' long, which benefited both the Tau as well as the Orks.

Bryce was able to take advantage of the table's length to position his Broadsides with their long range railguns well outside of our range; he hammered our armies throughout the game with impunity. His other Battlesuits also started beyond our guns' range and used their mobility to close in quickly. In the meantime, the narrowness of the map gave the Orks a significant advantage. While a standard deployment on a 4'X6' or 4'X8' board forces Orks to spread out and gives their opponent room to maneuver and to more easily attack their flanks, a narrow map like the Hammer and Anvil allows them to stretch from table edge to table edge and sweep down onto their opponents like an enormous green bulldozer. Even if we wanted to rush the Tau forces, we would have to punch through a greenskin wall to do it.

Carl's list proved to be another unexpected liability. While 2+ armor saves excel against most armies, the cost of the Terminators meant that he had very wounds or shots on the table. With Orks bearing down on you and strength 10, AP1 railguns laughing at your fancy Terminator armor, the Terminators didn't have much of a chance.

Turn 1
Turn 1 ended up with night fighting rules, which denied the Broadsides their opening salvo. The Orks made their usual charge while the Tau troops stayed mostly behind the green wall. A squad of Lootas poured fire into the Grey Knight Terminators who failed way too many 2+ armor saves. My Snipers, who had to forgo camo cloaks due to point limitations, took advantage of the 3+ cover save granted by the nearby Imperial Statuary. Unfortunately, the neophytes still failed several cover saves.

The Piranha successfully hit the Vindicator's front armor but the result was merely a glance. It was during this game that I gained an appreciation for the new hull point rules. Under 5th, a glancing hit from an AP1 weapon would have a good chance of preventing the Vindicator from firing in its following turn. Under the new rules, my Vindicator got one step closer to being wrecked, but it still had a chance to hit back in the following turn.

The Marines suffered from a lack of long range fire, but they still did some damage in their turn. The Vindicator's Demolisher cannon missed the Piranha but hit the Killa Kan, which lost a hull point and was stunned, and killed several other models. The Tactical Squad once again took advantage of the new rapid fire rules and took a small toll on the oncoming mobs. The Grey Knight Terminators tried their best, but their storm bolters seemed to do little damage (Carl's rolling that night was atrocious). The Purgation Squad had a lot more luck and was able to inflict some damage. Jon's new Warbiker Mob was wiped out, which gave the Marines a victory point for destroying a Fast Attack unit. Realizing that marching into the face of railgun fire would be suicidal, I kept the Ultramarine Terminators in reserve in the hopes that I could teleport them in the next turn and tie up the Broadsides.

Unfortunately, the Astartes long range firepower lay in the Grey Knights' Land Raider, which was hampered by the night fighting rules. The tank was mostly wasted gunning down models of lower points value. Given how many enemy models were on the table, a Land Raider Crusader probably would have been more useful.

Turn 2
The Piranha's fusion blaster penetrated the Vindicator's armor on the second turn and achieved a weapon destroyed result (my disappointment was mitigated by the fact that we finally got to use my new vehicle damage dice). Another change to 6th is randomization of which weapon is destroyed; unfortunately for me it was the Demolisher cannon rather than the storm bolter. Although the Broadsides laid into the Land Raider, several missed shots and low penetration rolls ensured that the tank kept going. Carl's Terminators took even more shooting casualties before Jon declared a Waaagh! and hit one of the two squads with nearly 20 Boyz. The Grey Knights' fancy force weapons are wasted on Boyz so we all got to witness the effect of 45+ strength 4 attacks against three Terminators (the Terminators lost).

Despite 6th Edition's more forgiving reserve rolls, the Ultramarine Terminators had to sit out another turn. Those Astartes on the table struck back and wrecked the Killa Kan while the Piranha exploded under a hail of Purgation Squad fire. The Ultramarines wreaked vengeance on the briefly victorious Boyz by hitting them with fire from both the Sniper and Tactical Squads. One of the most remarkable shots of the game occurred when the Tactical Squad's flamer hit nine Boyz and killed eight of them. The survivors were charged by the Ultramarines, who made short work of the Xenos scum.

Turn 3
With nearly all the Ork units except for the Lootas having taken heavy casualties, the Tau began their advance in earnest. Fire warriors, the Crisis Battlesuit Bodyguard, and the Stealth Team eliminated the last of the Grey Knight Terminators and the Purgation Squad. The Broadsides again failed to destroy the Land Raider, but succeeded in destroying a twin-linked lascannon. The remaining mob of Ork Boyz and a power klaw Nob assaulted the Land Raider, but the power klaw was unable to glance or penetrate its armor. Heavy fire and poor cover save rolls reduced the Sniper Squad to a single Marine. The Grey Knight Razorback was soon wrecked.

The Ultramarine Terminators finally arrived from reserves, but with so few friendly units on the board there was little reason to even try to take on the Broadsides, particularly since the Broadsides were being covered by two nearly intact Loota Squads. The Terminators therefore landed within range of the Fire Warriors. My Munitorum dice, which had been pretty lucky up until that point, failed me during the shooting phase while Bryce made most of his armor saves. That left my unit within rapid fire range of ten Fire Warriors with as many strength 5 weapons. My Tactical Squad charged the Ork mob that had previously assaulted the Land Raider but, again, the dice did not cooperate. The sergeant who was left standing found himself surrounded by Orks.

Turn 4
As Jon and Bryce began the turn, it occurred to me that the only scoring units the Marines had left was a lone Sniper Scout and a sergeant that was probably going to be killed in the next round of close combat. It was clear that the Emperor wasn't going to be saving the Astartes and so we called the game.

All in all it was an interesting game. Although the Marines ended up in the worst possible position (i.e., playing against a strong combination of allies on a table that most benefited the enemy forces), a comparison of victory points showed that it wasn't a total rout. The Marines earned three victory points for destroying all Ork and Tau Fast Attack units. (This might not be a fair comparison since the Marines didn't bring any Fast Attack units for the Tau and the Orks to score off of.) Although Bryce and Jon never actually held the two primary objects, we obviously attributed the six victory points to them when we called the game.

As for the bloodletting part of the game, I was surprised by how well my Ultramarines did. Although I effectively had 520 points of Marines (the Terminators showed up too late to influence the game), the allied force may have killed more points than Carl's primary detachment. A lot of the Grey Knights' 1000 points was invested in Terminators that drew a huge amount of fire and died without having earned their points. The Purgation Squad, which benefited from its ability to target units without having line of sight, seemed to do better, but its 24" range left the squad vulnerable to fast moving Tau units. With the Broadsides out of its range and only cheaper Ork units nearby, the Land Raider ended up being an enormous points sink. Under other circumstances I think the Grey Knight army would have been formidable, but it didn't have a prayer against the Ork/Tau alliance.

After the game I thought of ways that the Ultramarine Terminators' 230 points could have been better spent. It occurred to me that a ten man Sternguard has nearly the same cost (i.e., 250 points without upgrades), can put out almost as many shots when it's between 12" and 24" from the target, and can put out nearly twice as many shots when it's within 12" of the target. With Hellfire rounds the Sternguard would be killing Orks on a 2+ rather than a 4+, the AP4 Kraken rounds would match the Fire Warriors' weapons range while denying them their armor saves, and AP3 Vengeance rounds could deny armor saves to most Battlesuits. Each Sternguard Marine is slightly more likely to die than a Terminator, of course, but the Squad makes up for it by having twice as many troops. All the more reason for me to pick up the pace on that Sternguard Squad I've been sporadically working on for months.

Sunday, July 29, 2012

First 6th Edition Game

Last night was the Cabal's first game under 6th Edition. Jon's Orks and Kevin's Dark Eldar faced off against Carl's Grey Knights and my Ultramarines. Since we were already trying to figure out so many other new rules, we didn't bother with the allies rules.

The game was close, although Jon and Kevin had the most kill points left when we finally called the game. The Marines had the misfortune of being unprepared for the fight. Each player was limited to 750 points, meaning that we couldn't bring some of our meaner units to the game. Also, Carl was using a highly experimental list that proved to be uncompetitive. Finally, both Kevin and Jon brought flyers, which Carl and I were totally unprepared for. Although the Ork Bommer and the Voidraven didn't do too much damage, they attracted a lot of fire that would have been better directed elsewhere.

My overall impression of 6th was very good. It didn't take too long to get used to new rules like the revised wound allocation since most are pretty intuitive. I even took advantage of it by placing a Captain with artificer armor in the front of a squad. Jon initially laughed at me for putting my most important model directly in the line of fire (he put his Warboss in the middle of his mob) until he realized that the multi-wound model with the 2+ armor save was deflecting nearly everything he could throw at it in order to protect the rest of the squad. When the Captain got down to a single wound, he started taking advantage of the Look Out Sir rule.

I'm also a fan of the snap shot. One Ultramarine successfully fired a missile launcher while on the move, killing an Ork. And a Razorback with a twin-linked lascannon was able to get around an obstacle blocking its line of sight by moving at cruising speed and then successfully hit a Dark Eldar Venom, immobilizing it. Even though you usually have only a 1 in 6 chance of hitting something with a snap shot (a little better than that if you have twin-linked weapons or weapons that put out a lot of fire), it's nice that we're at least allowed to make an attempt under 6th Edition's rules.

For me, the biggest change (and best improvement) was the revision to the rapid fire weapon rules. Now that the range of rapid fire weapons is unrestricted by movement, Tactical Squads, Sternguard Squads, and Scouts with bolters no longer have to avoid moving just so they can get in that one 24" shot. Last night, when my Tactical Marines found themselves 26" from an oncoming Ork mob, they were able to move forward just enough to get in their shots. Under the previous rules the turn would have been an utter waste for the Marines. Between the new rules and my new Destructor-pattern Predator a mob that would have completely overrun my squad before was whittled down to a single boy and a wounded Warboss (the Warboss was promptly dispatched by a Dreadnought).

By the end, the other Cabal members said that they liked the new rulebook. I don't think they liked it quite as much as I did, though.

Sunday, April 22, 2012

Catching Up with Battle Reports

I neglected to blog about the games of a couple weeks ago, so here's the synopsis:

Kevin and Jon went head to head with Dark Eldar and Orks, respectively. Jon was utterly amazed at how many shots a loaded Venom can put out and took heavy losses early on. Although Jon's new Killa Kans made a good effort at knocking the skimmers down, Kevin was pretty lucky with his 5+ saves. Despite the initial losses, the Greenskins evened up the score once they had finally crossed the table. I'm not sure which of the two officially won, but apparently the score was too close to really declare either player the winner.

Kevin puts a lot of work into his models

Jon's experience with his Killa Kans was mixed

For the second game night in a row I played the Cabal's Daemon army (by that I mean the Daemon army purchased by Bryce for use by the Cabal members). I went up against Carl's Grey Knights and discovered that a) Carl had been reading his codex and b) Grey Knights have a lot more advantages over Daemons than Daemons have over Grey Knights. Carl took advantage of Warpquake, which causes enemy units trying to deep strike within 12" of a Grey Knight squad with the special rule to have a mishap. This was devastating to the Daemons since the shooty units were too far away to do much damage on the first turn and the close combat units had to crawl across the table under fire. This, combined with the fact that the Grey Knight's have the preferred enemy rule over Daemons, meant certain doom for the denizens of the Warp. Carl has since purchased a Soulgrinder for the Cabal's army in the hopes that it will help to even things out a bit.

The Cabal's Daemon army

Bryce used heavy blue washes for the Grey Knights

The Bloodletters are supposed to be tainted by another
god of Chaos, hence the blue color

This past game night saw a four way, 1000 points per army free for all on our new 4'x8' table. (While I had remembered my camera for the previous game night, I forgot it for this one.) As usual Carl had his Grey Knights and Jon brought his Orks. Bryce and I, who regularly alternate between armies, played Eldar and Ultramarines, respectively. Carl and I set up across from each other while Bryce and Jon set up on the far end of the table. I had first turn and used a partially assembled Drop Pod to land a multi-melta Dreadnought within melta range of Bryce's Wave Serpents. I love this gambit, which not only strikes fear into the hearts of your opponents, but can be very effective. Unfortunately, when it fails it can fail spectacularly since you leave a unit in the open having earned none of the 140 points you just expended trying to pull it off. I thought the Dreadnought was doomed when I missed the opening shot. I turned out to be very wrong, much to Bryce's frustration.

On the other end of the table I had taken advantage of the terrain to set up my Snipers within range of Carl's Dreadknight. Unfortunately I was only able to inflict two wounds, one of which was rending, and Carl was able to save both. On a subsequent turn, the Snipers inflicted two rending shots on a Grey Knight Purifier squad while my Tactical Squad's missile launcher killed another. My decision to attack the Knights with half my squads while dedicating the other half to fight the Eldar turned out to be a serious tactical error. Carl kept most of his forces together and hit me with everything he had while Bryce had enough units and shots to occupy both me and the Orks. Although he made his first kills against the Orks, Carl saw my Scouts as a threat and sent the Dreadknight after them. It inflicted six wounds on the six models, all of which had 3+ cover saves. In my unluckiest roll of the night, I rolled a four and failed all the remaining five cover saves (this is not the first time my Scouts have been decimated by failed 3+ cover saves). The five-man heavy weapon half of my Tactical Squad met a similar fate when they failed five out of six 3+ armor saves.

On the opposite end of the spectrum of luck, a Grey Knight Venerable Dreadnought and an Ultramarine Vindicator traded shots back and forth for several turns. Twice the Vindicator stunned or shook the Venerable, but it was neutralized by the Psychic Pilot. And twice the Venerable was destroyed and then saved by the Venerable rule (remind me why so many Space Marine players think Venerable Dreadnoughts aren't worth the points?). Although unable to destroy the much more expensive Venerable Dreadnought, the Vindicator was able to survive multiple lascannon attacks that either didn't penetrate its armor or that merely shook or stunned it. When finally forced to use smoke launchers, it made every 4+ cover save against both the Venerable and the Dreadknight. Finally, the Vindicator was immobilized and, in the subsequent turn, lost its primary weapon. It gave up the ghost when the Venerable Dreadnought and the Dreadknight smashed it to pieces.

In the meantime, Jon fully dedicated his Orks to fighting the Eldar, although he lost his Lootas early on to Carl's Dreadknight. The Orks pressed forward against heavy Scatter laser fire and eventually got into combat with Asurmen and his Dire Avengers. Although I didn't closely follow that fight, it seems that Asurmen made an incredible number of armor and invulnerable saves and that his squad made a big dent in the Ork mob. I had been marching my Terminators, a heavily upgraded Captain, and the close combat half of my Tactical Squad towards the Eldar when Carl teleported a five-man Grey Knight Strike Squad into range of my forces. I directed my fire towards them and eventually killed four of the five. After that delay, I was able to get three surviving Terminators close enough to a Wave Serpent to destroy it, took two more casualties from bright lance fire, and then lost the final Terminator when he tried to assault an Eldar walker across dangerous terrain. My remaining Tactical Marines were wiped out by Scatter laser and Psycannon fire coming from two different sides. I lost my very expensive captain when he was hit by a bright lance and failed his invulnerable save (he spent most of the game trying to cross the table and did almost nothing else).

And then there was my Dreadnought. After failing to hit anything upon leaving the Drop Pod, I had given it up for lost. But for multiple turns Bryce poured all his bright lance fire into it and manged only to stun it, shake it, and destroy both its close combat weapon and its multi-melta. Still it kept on going until it finally limped into combat with two Eldar walkers and destroyed both. When it started its march towards a Wave Serpent, Bryce again opened up his bright lances on it... and failed to penetrate its armor. Bryce was reduced to yelling, "Why can't I kill this Dreadnought!?! Somebody please kill this Dreadnought!" Finally, Carl's Venerable Dreadnought shot it from behind and succeeded in immobilizing it. Bryce declared the Dreadnought the game's MVP for soaking up so many shots and still earning back its points. You don't get to be a Dreadnought by being a quitter.

With the Orks gone and the Ultramarines reduced to a single immobilized Dreadnought, Bryce and Carl finally went head to head. The Eldar bright lances eventually carried the day, although Bryce pointed out that had we called the game at the traditional six turn mark, the Grey Knights would have won based on the number of points remaining.

Lessons Learned

Much of what we got out of this game simply confirmed what we learned from other games. For example, the survivability of Venerable Dreadnoughts and the indirect value of a unit (who knows how much my Dreadnought earned in the form of Bryce's expended opportunity costs). For me, the biggest lesson was...

Beware of Dividing Your Army
Although the game was a four way free for all, there was no reason for us to attack everyone else simultaneously. It wasn't too surprising that it was just Carl and Bryce left at the end. Jon was fully dedicated to attacking Bryce (who designed his Eldar army to take on hordes), Bryce ignored Carl because he didn't pose an immediate threat (they were on opposite corners of a 4'x8' table), and I divided my forces between Bryce and Carl. Originally I had intended to send the entirety of my army against the Eldar, but I saw the opportunity to take shots at the Dreadknight, figured that I should back it up with something, and dedicated a large chunk of my army to fighting the Grey Knights. This isn't the best idea given how few in number Marines usually are. Other than wiping out the Lootas that weren't shooting back, the Grey Knights mostly avoided a two front war and instead focused on a part of my army. Had I thrown all my forces against a single opponent at a time, I think I would have done a lot better, especially since a headlong rush at the Eldar would have meant that Jon and I would have been attacking Bryce almost simultaneously. As it was, the Eldar were able to whittle down the bulk of the Orks before redirecting their fire at my partial army.

Wednesday, March 14, 2012

Orks and Imperial Guard vs. Ultramarines, Part II

[See Part I of this series]

Although things were looking bleak for the Ultramarines, a glimmer of hope came when my Terminator squad assaulted Jon's mob of 'Ard Boyz. The mob had been whittled down through bolter fire and was very close to losing Mob Rule. Although the Big Mek's power weapon was able to take out two Terminators, the other three were able to survive long enough to inflict the damage necessary to cause the mob to fall back and eventually run off the table. As much as I would have liked to back off and get a couple of turns to wear down a second mob that was only a short distance behind the first, the mob was too close to avoid further close combat. The Terminators fired into the second mob and assaulted to ensure that the Orks wouldn't get their furious charge. This fight saw the end of the Terminators but not before they severely weakened the second mob. When the mob headed towards the Tactical Squad, they were slaughtered by bolter fire and the survivors ran off the board. A quick count showed that the Terminators earned back their points, which is something that particular squad seems to struggle at.

Greenskins slaughtered or your money back

Near the end of the game the assault half of my Tactical Squad was finished off by Loota and Guard fire, although not before it wiped out a squad of Guardsmen that was perfectly positioned to be hit with a flamer template. I rarely have such success with a flamer. The heavy weapon half of the squad was wiped out in a single turn when one of Bryce's squads used the Bring It Down! rule to twin-link their plasma rifles. Fortunately, the missile launcher in my squad was able to destroy the lascannon on one of Bryce's two Sentinels before being killed. I was soon left with a wounded Captain, a weaponless but still mobile Land Raider, and a disarmed Venerable Dreadnought locked in endless combat with a Sentinel and a squad of Guardsmen. On the other side of the fight, Jon had lost two of his three mobs and his Lootas had taken several casualties. Although he still had two DeffKoptas available, they were doing only a small amount of damage. Bryce had an immobilized Basilisk that seemingly couldn't hit the broadside of a barn (thank the Emperor), two Sentinels with destroyed lascannons, a Chimera, and various Guardsmen spread across the table.

After briefly loading him into the Land Raider to protect him from Jon's Lootas, the Captain disembarked from the tank's ramp to launch a one man assault on a mob of Boyz and one Nob. For whatever reason, the Captain has a bizarre amount of luck and has rarely disappointed me. He once survived several rounds of combat with a Hive Tyrant and three Tyranid Warriors. He made four or five consecutive Iron Halo saves, an even greater number of armor saves, and managed to kill the Hive Tyrant and a Warrior before finally being lost. The Captain didn't disappoint me this time, either.

My shiny armor will drive off the Xenos scum!

I wish I had gotten a picture of the Captain standing on the assault ramp but I keep forgetting to bring a camera to our games. I couldn't help but to imagine an angry and vengeful Space Marine Captain emerging from a smoking Land Raider, igniting his power sword, and running directly into a horde of slavering Orks while screaming something about the Emperor. The Captain charged into the waiting Orks, dished out some punishment, made all but one armor save, and made an Iron Halo save against the Nob's power klaw. The unfortunate Orks, having lost combat and being below the minimum numbers required to benefit from Mob Rule, failed their morale check and fell back. Since they had also been reduced to less than half their original size, they were unable to regroup and ran off the table.

Looking for more Greenskin blood, the Captain made a headlong rush towards the two DeffKoptas. He assaulted one and managed to inflict a wound. While the two were locked in combat, the Basilisk made yet another attempt to destroy the Land Raider. The shot drifted significantly and managed to land directly on the Captain and the two Ork units. Both DeffKoptas were destroyed while the Captain again made an Iron Halo save. When the dust had settled the Captain found himself in the open and was gunned down by the Lootas. Win or lose, it's moments like the Captain's last stand that make 40K worth playing.

It was kind of like this... but he was alone

Eventually the Basilisk succeeded in destroying the Land Raider. The Venerable Dreadnought went round after round with the Sentinel and the Guardsmen before a melta bomb finally destroyed it. (I was so groggy by that point that I directed all my attacks against the Sentinel; I would have had a lot more luck killing the Guardsmen.) The final count showed that Jon and Bryce had approximately 300 points remaining of their 1500 point army. Although the Marines lost, it wasn't by too much. And I felt that the Ultramarines had performed pretty well against an alliance that combines the Orks' very good close combat ability with the Guard's powerful and versatile ranged weaponry.

Lessons Learned

Pay Attention!
I seemed particularly scatterbrained that night and didn't take a systematic approach to using my units. I made Telion and a Scout with a missile launcher worthless for two turns by putting my Venerable Dreadnought in front of them. The Dreadnought was quickly stunned and the Scouts couldn't shoot their heavy weapons the next turn because I had to move them. I kept forgetting to use my drop pod's storm bolter, which was perfectly located to kill the Lootas that plagued me all night. And early in the game I actually forgot to fire my still-intact Land Raider's weapons. Since Bryce is a great guy he let me fire a twin-linked lascannon at his Guard early in his and Jon's following turn. It ended up destroying a Sentinel's lascannon. Thanks Bryce!

Venerable Dreadnoughts
A lot of Space Marine players balk at the cost of a Venerable Dreadnought, believing that it's not worth the improved ballistic and weapons skills and questioning the worth of the Venerable rule (i.e., the ability to require your opponent to re-roll on the vehicle damage table after he glances or penetrates the Dreadnought's armor). However, during the Grey Knights/Ultramarines game a couple weeks ago and during this past game, the Venerable rule saved my Dreadnought several times. Paying an extra 60 points to give your Dreadnought a very good chance of surviving vehicle destroyed or vehicle explodes results has proven to be worth it more than once. It's certainly cheaper than the cost of an additional Dreadnought. Carl can vouch for the staying power of his Venerables.

Indirect Value of a Unit
Sometimes a unit doesn't have to kill its own value to be worth the cost. My Venerable Dreadnought killed very few points since it spent the vast majority of the game stunned or shaken. (I seem to remember that at least one of those times was thanks to a vehicle destroyed result that was re-rolled as a stunned result.) However, by being a perpetual threat it was a constant target for Jon's Lootas. Each turn that the Lootas poured their shots into the Dreadnought was another turn in which they weren't shooting at more vulnerable units. I wouldn't be surprised if the Venerable Dreadnought effectively earned its points in the form of Jon's opportunity costs. Bryce often uses his Eldar Wraithlord for this very purpose. He never builds his strategy around it. Instead, because it's a big, scary monstrous creature that's hard to ignore, he uses it as a fire magnet to protect more vulnerable but more strategically important units.

Bringing a Gun to a Knife Fight
I've said it before; a Devastator Squad with four missile launchers is of little value against a horde army. For the exact same cost the squad could carry heavy bolters that would put out three times the shots. Although the heavy bolters would wound most Orks on threes instead of twos, their increased volume of fire would easily compensate for the lower weapon strength while their AP value would still deny armor saves to Nobz and 'Ard Boyz. Given that I was facing both Orks as well as mechanized Guard, a mix of heavy bolters and missile launchers may have been appropriate. Unfortunately, I prefer to play with models I have rather than to proxy a different unit. Thus, I stuck with four missile launchers despite knowing them to be less effective against the armies I was fighting.

The Land Raider had staying power... and was also completely inadequate for fighting so many models. It was able to take out a Sentinel's lascannon and a few Lootas (darn those cover saves), but I really needed to whittle down the mobs more. With the shear volume of shots that a twin-linked assault cannon and two hurricane bolters can produce, a Land Raider Crusader would have slaughtered the Ork mobs and sent them running. The moderately armored Sentinels might have been taken care of with the Crusader's twin-linked assault cannon or its multi-melta.

Standard Terminators are tank killers or a highly survivable but extremely expensive source of bolter fire, not a close combat squad. An initiative of 1 and a mere 5+ invulnerable save makes them expensive sitting ducks if the opponent has his own power weapons (e.g., an Ork Big Mek). The Terminators earned their points this game only because they had a lot of luck making armor saves against a huge number of attacks, because the Big Mek only killed two of them before the squad could make the mob run, and because they were able to do enough damage to the second mob before dying that a Tactical Squad could force the Orks to fall back with bolter fire. A close combat Terminator Squad would have been significantly more effective. Pairs of lightning claws would have given each Terminator four attacks on the charge while allowing re-rolls for fails to wound (this is vital when your opponent's toughness equals your strength). Thunder hammer and storm shield-carrying Terminators would have low initiative but high survivability against an enemy with power weapons. In this game, three or four Terminators with lightning claws would have been able to reduce the number of opponents while one or two Terminators with thunder hammers and storm shields could have borne the brunt of the power attacks.

Appropriately Using a Unit
I wasted the Tactical Squad by not being aggressive enough. In a game where I was vastly outnumbered, three Marines with bolt guns, one Marine with a flamer, a sergeant with a chain sword and plasma pistol, and a Marine Captain spent much of their time crammed into a corner of the table staying out of the Lootas' line of sight. I should have rushed the ruins in which the Lootas were hiding after the nearby mobs were running or were tied up with the Terminators. Also, I'm starting to wonder whether using the Combat Squad rule is all it's cracked up to be. Typically I break a Tactical squad into an assault half (three bolters, a special assault or rapid fire weapon, the sergeant, and my HQ) and a heavy weapon half (four bolters and a heavy weapon). Too many times I've let four Marines stand idly by so that I can fire a lone missile launcher. In the meantime, the assault half rushes in and finds that it just doesn't have the volume of shots needed to do the job or enough bodies to tolerate the incoming fire. A heavy bolter in this game, or a lascannon in a game with more vehicles, might make it worth it to break into Combat Squads. However, in a game in which so many opposing units are denied armor saves by AP 5 weapons, it would probably be more effective to keep the squad together and to take on the enemy with simple bolt guns. Given the threat the Lootas posed, this would have been a good game in which to have a Rhino.

More Effective Use of a Force Organization Slot?
Although the Venerable Dreadnought occupied the Lootas' attention for most of the game, I have to wonder if drop podding in a Sternguard Squad and directly attacking the Lootas wouldn't have been a more effective use of an elite slot. Tying up the Orks wasn't quite the same as eliminating them since they did a lot of damage to other squads when they weren't shooting at the Dreadnought. Given the Orks' high toughness but poor armor saves, the Sternguard's AP 5, 2+ poisoned hellfire rounds could have been very useful. It would also be interesting to compare the effectiveness of my Terminators to that of a Sternguard.
Related Posts Plugin for WordPress, Blogger...